Monday, June 2, 2008

PHOTO FRAME

Metallic photo frame


Card board and cloth Frame

SocialTwist Tell-a-Friend

KALEIDOSCOPE


Materials Required:
3 rectangular mirror, card board, glue, cellophane tape, broken bangles, beads, Colour paper for decorating, 2 glass piece
SocialTwist Tell-a-Friend

Thursday, March 20, 2008

Saturday, January 12, 2008

Mehandi


Creating mehndi designs is actually quite simple and just takes practice to master. Mehandi design consists of taking small designs and motifs (Paisley [mango] shapes, straight lines, scallop lines, dots, tear-drops, leaf shapes, etc.) and combining them to make large, more complex designs as you will see here. I suggest that, if you are a beginner at mehndi, you purchase a henna book or find a number of small designs so that you can understand the basics of mehandi design.
SocialTwist Tell-a-Friend

Friday, January 11, 2008

Chutneys


BANANA CHUTNEY
INGREDIENTS
Banana-3, red chillies-6, thur dhal-2 tspn, urad dhal- 2 tspn, mustard-1 tspn, asafetida-1 pinch, salt-1 tspn, oil-4 tspn
PROCEDURE
• Cut the bananas into two and boil till done. Cool and peel the skin. Grate the banana.
• Heat oil in a frying pan and fry the remaining ingredients till golden brown. Ground to a coarse powder.
• Add the grated banana and mix well

BANANA FLOWER CHUTNEY
INGREDIENTS
Banana flower-1, thur dhal-½ cup, coconut gratings-4 tbsp, red chillies- 3 to 4, tamarind pulp- 2 tspn, salt- to taste, asafetida- a pinch, (oil- 2 tspn, mustard-½ tspn, urad dhal-1 tspn, curry leaves- few for seasoning).
PROCEDURE
• Remove the centre firm stem from each flower and chop the flowers.
• Heat 1 tspn of oil add thur dhal, red chillies and asafetida and fry till light brown.
• Add the chopped flowrs and sauté for few minutes till tender.
• Allow to cool. Mix with grated coconut, salt and tamarind.
• Grind to a coarse paste. Season and pour over the chutney

DATES CHUTNEY
INGREDIENTS
Dates-1 cup, chillies-2, garlic-2 pods, jaggery- 1 tbsp, tamarind-1 tspn, salt- to taste
PROCEDURE
• Chop the dates and soak them in half a cup of warm water along with chillies for 10 – 15 mts.
• Put all the ingredients and blend for a minute.

KOVAIKAAI CHUTNEY
INGREDIENTS
Kovaikaai-½ kg, tamarind-a bit, green chillies-6, garlic-if needed, onion-½ cup, oil-1 tbsp, curry leaves-to garnish
PROCEDURE
• Add oil and fry garlic, onion and kovaikaai.
• Add salt, curry leaves, chillies and tamarind and then grind to a coarse paste. Seasonings can be done

GROUNDNUT CHUTNEY
INGREDIENTS
Roasted groundnut-1 cup, tamarind- lemon size, dry chillies- 6, coriander-½ bunch, urud dhal-1 tspn, mustard and oil for seasoning, salt- to taste
PROCEDURE
• Add oil and fry urud dhal and coriander leaves.
• Add all the ingredients and grind. Season it with mustard.

BRINJAL CHUTNEY
INGREDIENTS
Brinjal-350 g, dry chillies-15, asafoetida-a pinch, tamarind-a bunch, black gram dhal-2 tspn, salt-to taste, oil-50 ml
PROCEDURE
• Grill the brinjal in heat and remove the skin.
• Fry black dhal, chillies, asafetida and salt with little oil along with the brinjal. Add tamarind and grind

BEETROOT CHUTNEY
INGREDIENTS
Thur dhal-2 tspn, urud dhal-2 tspn, onion-½ cup, garlic-2 pods, coconut-½ cup, beetroot-½ cup, garnish-oil, mustard, curry leaves-to garnish, tamarind water-2 tspn, salt-to taste
PROCEDURE
• Fry all the ingredients and grind.
• Add tamarind water and garnish the chutney.
SocialTwist Tell-a-Friend

Thursday, January 10, 2008

Butterfly Garden


Butterfly Garden
Butterfly gardening has become one of the most popular hobbies today. What could bring more joy than a beautiful butterfly fluttering around your garden?! Here are some tips to make your garden especially butterfly-friendly.
Your first step should be to find out which butterflies are in your area. You can do this by spending some time outdoors with your field guide to see which species are around.
Plant your butterfly garden in a sunny location (5-6 hours each day), but sheltered from the winds. Butterflies need the sun to warm themselves, but they won't want to feed in an area where they are constantly fighting the wind to stay on the plants. It is also a good idea to place a few flat stones in your sunny location so the butterflies can take a break while warming up.
Butterflies need water just like we do. Keep a mud puddle damp in a sunny location, or fill a bucket with sand and enough water to make the sand moist.
DO NOT USE PESTICIDES IN YOUR GARDEN!
Butterflies use two different types of plants - those that provide nectar for the adults to eat (nectar plant), and those that provide food for their offspring (host plant). It is best to find out which plant species are native to your area and plant those rather than exotic species. Be prepared for a heavy munching on your host plant.
SocialTwist Tell-a-Friend

Dosa Recipes


PANEER DOSA
INGREDIENT
Raw rice-1 cup,parboiled rice-1 cup,grated paneer-1 cup,green chillies-2,chopped coriander-1 tspn, salt-to taste,oil-as needed
PROCEDURE
• Mix both the rice and soak it for 2 hours
• Add salt to the soaked rice and grind.
• Add paneer, coriander and green chillies to the batter
• Make the batter into thick dosas.

PALAK DOSA
INGREDIENT
Raw rice-1 cup, Bengal gram dhal-1 tbsp,chopped palak-1 cup, green chillies-3.asafoetida-1 tspn,salt-to taste,oil-as needed
PROCEDURE
• Since the texture of the green varies Bengal gram should be reduced
• Soak the raw rice and Bengal gram dhal together for 2 hrs.
• Add palk, salt. Asafetida, green chillies and grind nicely.
• Leave it untouched for 5 hours to ferment
• Make it into dosas

DRUMSTICK LEAVES ADAI
INGREDIENTS
Red gram dhal- ½ cup,Bengal gram dhal- ½ cup,black gram dhal-1 tbsp,raw rice- ¼ cup, parboiled rice- ¼ cup, drumstick leaves-1 cup,grated coconut- ¼ cup,dry chillies-6,asafetida- ½ tspn,oil-as needed
PROCEDURE
• Mix the dhals,rice and the chillies and soak it for an hour
• Add asafetida and salt to the mixture and ground it to a coarse paste
• Add oil in a pan and fry the drumstick leaves.This aids in digestion
• Add the grated coconut and the fried drumstick leaves to it and make it into dosas

NAVADHANYA DOSA
INGREDIENTS
Green gram dhal- ¼ cup,black gram dhal- ¼ cup,Bengal gram dhal- ¼ cup, raw rice- ¼ cup,horse gram- ¼ cup, soya- ¼ cup, white corn- ¼ cup,gingelly seeds-1 tbsp,green chillies-3,dry chillies-6,ginger-1 slice,grated coconut-1 tbsp,curry leaves-a bit,asafetida- ½ tspn,chopped coriander-1 tbsp,salt-to taste,oil-as needed.
PROCEDURE
• Mix all the dhals and soak it for 5 hours
• Add the chilies, ginger,asafetida and salt and grind it along with dhals
• Add the chopped coriander, grated coconut and curry leaves to the batter and make it into dosas.

RAGI DOSA
INGREDIENTS:
Ragi – 1 cup, rice flour-1 tbsp, scrapped coconut-1 tspn, jaggery powder-1/2 cup, cahew and cardamom- as needed
PROCEDURE
• Add water to the jaggery mix it until it dissolves and boil it for minutes
• When the syrup is ready add ragi flour in it
• Mix thoroughly without lumps
• Add then add rice flour, scrapped coconut and cashews
• If needed water can be added to bring it into batter consistency
• Now make dosas with these batter and ghee.

MIXED FRUIT DOSA
INGREDIENTS:
Rice flour-1 cup, chopped fruits-apple, orange, pineapple, grapes, pomegranate, papaya
PROCEDURE
Grind all the ingredients together and prepare dosa. If u want it hot can add pepper to it.


COLOURFUL DOSA
INGREDIENTS:
Raw rice-2 cup, parboiled rice- 2 cup, blackgram dhal- ½ cup, fenugreek-1 tspn, salt-to tatste, chopped coriander-1 cup, grated carrot-1 cup, chopped onion or radish-1 cup, grated beetroot-1 cup, oil-as needed
PROCEDURE
• Soak raw rice, parboiled rice, blackgram dhal and fenugreek together add salt to it and grind
• Divide the batter into 4 parts and add the vegetable.
KAMBU(Jowar) DOSA
INGREDIENTS
Kambu-2 cup, parboiled rice- ½ cup, raw rice- ½ cup, dry chillies- 4, asafetida- ¼ tspn, scrapped or grated coconut- 1 tbsp, chopped coriander-as needed, salt and oil- as needed
PROCEDURE
• Soak jowar and the rice separately for 2 hrs
• Grind all the ingredients together and make dosa

MAIZE DOSA
INGREDIENTS
Maize-2 cup, parboiled rice- ½ cup, raw rice- ½ cup, dry chillies- 4, asafetida- ¼ tspn, scrapped or grated coconut- 1 tbsp, chopped coriander-as needed, salt and oil- as needed
PROCEDURE
• Soak maize and the rice separately for 2 hrs
• Grind all the ingredients together and make dosa


MIXED VEGETABLE DOSA
INGREDIENT
Raw rice-2 cup, chopped vegetables- (carrot,capsicum,beans and peas)-1 cup, green chillies-2, chopped coriander- to garnish, salt and oil- as needed
PROCEDURE
• Soak the rice separately
• Grind all the ingredients together or grind the rice and others separately and mix them
• If the raw smell of the vegetables is not appetizing then cook the vegetables for few mts and then add.
• Don’t add too much of water.
• Now make dosas with the batter

PIRANDAI DOSAI
INGREDIENTS
Raw rice-2 cup, parboiled rice- 2 cup, black gram dhal- ¼ cup, tender pirandai- ½ cup, fenugreek- ½ tspn, salt and oil- to taste
PROCEDURE
• Soak raw rice, parboiled rice and fenugreek for 3 hours
• Grind them when the rice is half ground add pirabdai to it and continue
• Add salt to the batter and allow to pulikka over night
• Make dosas with the batter

Other dosas include wheat dosa, rava dosa, podi dosa, ghee roast, ladies finger dosa..
SocialTwist Tell-a-Friend

Paper Sculpture


Materials Required
newspaper, tissue paper, cardboard,glue,paint,masking tape and gold powder
Procedure
1. Take newspaper and roll it tightly with a help of a broom stick.
2. now stick the other end so the role doesnt come out
3. Make as many rolls needed
4. Now bend a paper roll to make the torso, 2 hands
5.make a ball of newspaper for the characters head
use masking tape to attach the body parts
6.mix glue with water 1:3 and apply over the sculpture and paste the tissue paper
7.allow it to dry for a day and paint it black
8.take it on the next day and apply gold powder
9.now ur paper sculpture is ready for display
10.prepare musical instruments or sports article with cardboard and attach it to give a better look.
SocialTwist Tell-a-Friend

Sunday, January 6, 2008

Bonsai


One theory about the beginning of Bonsai is that it actually originated in India. Ancient ayurvedic physicians carried back shoots from medicinal trees from the Himalayas and grew them in miniature forms in pots by trimming and cutting back the roots, the tulsi being a good example of this. In the 12th century Bonsai in India was known as Vamanatanu Vrikshadi Vidya which translates as the science of dwarfing trees. Bonasi is am art and it needs a lot of patience…I own a ficus and bonsai peepal 3 yr and 2 yr old…


CREATING A BONSAI
Its fun and enjoyable
Selecting a plant for Bonsai
Plants that are suitable for Indian climates are

Botanical Name
Ficus bengalensis
Ficus riligiosa
Ficus glomerulata
Mangnifera indica
Bouhinia varigata
Citrus lemon
Citrus auriculatum
Duranta variga
Bougain villea
spectabilis
Bamboosa species
Achrus sapota
Delonix regia
Psidium guava
Pine Lausonia inermis

Soil for bonsai
Bonsai soil is much more free draining than potting soil and doesn't contain as much fertilizer as normal potting. Making your own soil mix isn't as hard as you think A basic bonsai soil mix to use - and one that would apply to almost all species is: one part loam, two parts sphagnum peat moss, two parts granite grit.

Feeding bonsai
To keep your bonsai in good shape and to maintain healthy growth requires regular feeding at the right time of year with the correct fertilizer. Fertilizer must be continually replenished due to a certain amount being washed out each time the plant is watered.
To understand exactly how your bonsai should be fertilized, you must be able to understand the basic make-up of fertilizers.
Nitrogen is an essential ingredient for leaf and stem growth. Too much nitrogen however will make the tree produce long, stringy growth. Phosphorus encourages healthy root growth and helps the growth of new buds, whilst also protecting against disease and unfavorable winter conditions. Potassium (potash) encourages the formation of flowers and fruit, and is vital in the fight against disease.
feed your bonsai from early spring to late summer. Use a balanced fertilizer with a fairly low nitrogen content year round, and one with as little (or no) nitrogen as possible in autumn to aid the tree (so the tree can retain its energy) through the winter. Bonsai fertilizer has an NPK (nitrogen, phosphorous, potassium) ratio of 0:10:10. This is an autumn feed (containing no nitrogen) which will harden off the current season's growth in readiness for the winter.

Pruning Bonsai
Pruning is necessary to maintain (or refine growth to obtain) the right shape of a bonsai and encourage new growth. Some plants naturally respond well to pruning. To prune correctly you must find out the type of plant your bonsai is and research when the best times are to prune old and new season growth. Generally, new growth is pruned during the growing season to maintain the shape of the bonsai, while pruning of hard wood (old season growth) is done in mid-autumn.

Finger pruning
This involves pinching back new growth which does not come within the general shape of the bonsai or is at the top of the bonsai - helping to encourage bushy foliage and a more tree-like looking bonsai. To do this, take the growth between your thumb and forefinger while holding the branch with your other hand and remove with a twisting movement. This is better than trimming the growth with scissors, this leaves an unnatural look and leaves the foliage an unsightly brown.e.g. junipers and cedars

Scissor tip pruning :
For deciduous trees scissor tip pruning is best. When trimming outward or 'overenthusiastic' growth, trim shoots back to just after the next series of leaves, but don't cut the foliage as such.e.g. maples, the chinese elm and cotoneaster.

Leaf pruning :
It is also known as defoliation, in bonsai is used for several deciduous and tropical plants such as ficus or maples to reduce leaf size, remove unsightly leaves and speed-up growth by causing two seasons' growth in one. For deciduous trees such as maples it also means that their autumn country is brighter. This is done in mid-summer, by cutting 60-90% of the leaves off the tree, only leaving a few to ensure that the tree keeps its energy. Remove leaves with fine scissors, cutting them from directly behind the leaf. In the next few weeks make sure that you keep the plant in a hospitable position and climate and supply it adequate water. Remember however, that this form of pruning is only applicable to certain types of plants.

Wiring Bonsai
Not all plants need wiring to achieve their desired shape or to achieve official 'bonsai' status. wiring of a bonsai is not done to keep the plant small, but rather is a temporary measure used to hold branches in a desired position in order to enhance the shape of a tree. Wire should not be left permanently on a tree and should be checked regularly.
Wire and gauge used - copper wire and aluminium wire, Aluminium wire is better and easily malleable. 3.5mm aluminium wire or 2.0mm for small branches.

Procedure
When wiring, try to imitate the natural curves of trees in nature. Make sure that you only attempt to wire branches that are unlikely to break when pressure used to twist the wire around the branch is applied. The safest method to use when wiring is by clenching the branch with both hands (not dissimilar to the look of a clamp) and applying the wire by slowly following it around the branch - making sure it does not damage the trunk. Wire the branch first, and then worry about bending the branch (which is made possible by the wire and using the clamp method) to achieve your desired shape. Be careful of leaves or if in autumn, leaf buds. It is always best to anchor the wire so it does actually re-train the branch. This can be done by digging it into the soil and training the wire up the trunk until it reaches the desired branch, or by anchoring it to another branch It is best to not water a day before wiring, and to keep the tree in shade for two weeks after wiring. Check every few weeks for wire cutting into the bark of the bonsai - particularly during spring and summer, or risk the danger of irrepairible scars.

Repoting bonsai

Regular repotting of your bonsai to replace important nutrients, 'stale soil' and allow for new root growth is vital to your bonsai's health and growth. Generally, the trees should be repotted at a time when they are most dormant - such as late autumn to early spring, so that they are subjected to the least amount of stress possible. Young or small bonsai require repotting every two or three years, and older and larger specimens less often. A bonsai needs repotting if water takes a long time to drain through the soil or if the roots are crowding around the sides.

Procedure
To repot, carefully lift the tree out of its current pot by tilting it to one side and trying to move it by the base of the trunk. You can not pull too hard on the trunk - so if this does not work, try tapping the pot with the side of your hand to loosen the rootball or poke a stick through the drainage holes and 'push' the rootball out. Next, using a chopstick, knitting needle, metal hook or similar, remove any moss or accent plants and carefully try to brush and untangle the roots. Start at the edge and gradually work around. Try to 'comb' and 'tug' rather than to 'pull' at the roots - for risk of damaging or tearing some very important main roots.
After this has been done - continue to shake and brush off the soil until about one third to half of the original soil has been removed from the edge and base of the rootball. It would now be a good idea to spray the roots with water to ensure that they do not dry out and so that they will not have too much soil on them when it comes time to pruning the roots.
To prune the roots, use very sharp cutters. There are bonsai root pruning scissors commercially available, however you could just use a normal pair of bonsai clippers. Start by cutting the thick, old brown roots that have come close to the edge of the pot and are restricting the growth of the young 'feeder roots'. Remove a third to a half of these - being careful that you do not remove too many feeder roots in the process. Next, prune the thinner roots which hang below the depth of the pot by trimming them all into a suitable shape that the pot will accommodate. This should be a shape that fits comfortably into the pot with a 1-2 cm (1/2 to 3/4 in) space between the edges. .
Clean the original pot thoroughly or select a new pot that is more suited to the tree and cover the drainage holes with simple wire mesh. As the plant will now be unstable in the new pot as it has nothing to anchor it - we have to make some anchors to prevent the tree from falling over from winds or from being moved. Thread some wire (doesn't need to be very thick) through the drainage holes or specially designed holes for anchoring and leave for later use. Add a thin layer of gravel to aid drainage and then a layer of soil. Moving the tree around, decide a basic position for it (usually off-center and slightly to the back of the pot) and make a small mound that it will sit on.
Now you can place your bonsai on the mound by gently nestling it in and spreading its roots out evenly throughout on top of the soil. Once you are happy with the height and position of your tree (it is going to stay like that for 1-2 years), take the wires that you threaded and twist them together over the main rootball of the tree until it is held firmly and will not rock. Because these wires are quite unsightly, you can remove them in a few months time once the tree has settled in.
Add more soil up to the base of the trunk - which should be just below the base of the pot. Tap the side of the pot with your hand to ensure that the soil becomes settled and that there are no gaps around the roots. Use your chopstick to incorporate the roots into the soil and to make sure that they are placed correctly. . Don't fertilize at this time - as this can burn or cause stress to the plant. You can feed in around a month though, when the roots have recovered.
Note that to balance out the extensive pruning you have just done on the roots, you should prune the branches of the bonsai as well so that it can recover quicker and not be disadvantaged further. Root growth usually does equal branch growth.

Watering bonsai
A dry wind, excessive heat, or a combination of both, can quickly dry out the soil, so you must monitor moisture levels regularly. Generally if you keep your trees outside where rain can water them, you don't need to worry much in the winter except in times of hot weather or little rain. In the summer you should endeavour to water your plants several times a week, and daily in very hot periods - where you should move the trees into the shade. You may find it is a good idea to set up a drip sprinkler system - where the bonsai are watered every day in the summer and every three days in the winter. Alternatively, you can use a watering can with a fine rose attached to water the soil and roots. Using a general water sprayer to increase humidity is also a good idea if your climate experiences dry periods.
SocialTwist Tell-a-Friend

Friday, December 21, 2007

Eggxtra Ordinary Characters


Materials Required
Egg shell, color papers, markers, glue
Procedure
Make a small hole on the egg, discard the contents and clean it in running water
Allow it to dry
Draw characters and decorate it accordingly
U can add hands too.
Make as many characters as u can and create your own story.
You can make a thie, a police in uniform, couples dining together etc..
SocialTwist Tell-a-Friend

Saturday, December 15, 2007

Spray painting


Spray painting
Materials Required
Paper, water colour, cardboard, tooth brush
Procedure
Draw any picture in the cardboard and cut it out
Now arrange it in the A4 sheet to create a picture
Now take the colour in the bristle. Run your hands through the bristles to spray the colour
The colours will be produced in the form of tiny droplets
Use diferrent colors to create a patern
I have used pebbles to create a picture instead of paper cutting..
SocialTwist Tell-a-Friend

Scratch Painting


Scratch Painting
Materials Required
Paper, Crayons, black poster colour, comb, coins, pins, ice cream stick can be used to create various texture
Procedure
Take a paper and paint it with crayons in abstract manner. Fill the paper don’t leave any gap.
Paint a thick layer of the poster colour on the crayon don’t add water. Water makes the paint to dilute and the colour wont stick to the crayon
Allow it to dry.
Now use materials like comb or bamboo stick to scratch out the black color .
Use different materials to create variations.
SocialTwist Tell-a-Friend

Blow Painting


Blow Painting
Materials Required
A4 sheet, Photo ink Varied colours, straw
Procedure
Decide the outline and painting that you want to make
Place a drop of photo ink and blow it with the help of a straw to create varied patterns like trees, peacock
Allow it to dry and then frame
Birds, animals can be made with just extending the drop with the straw as needed
SocialTwist Tell-a-Friend

Pencil shading

SocialTwist Tell-a-Friend

Friday, December 14, 2007

Rice recipes


CARROT RICE
INGREDIENTS :
Basmati rice – 1 cup, Grated carrot – 1 cup, Onion – 1, Green chillies -2,Boiled peas – ½ cup, Turmeric powder – ¼ cup, red chillies – ½ cup, Lemon juice – 4 tspn, Seasoning – Mustard, urud dhal, curry leaves and cashew nuts.
PROCEDURE :
• Cook rice separately and spread them on a plate with little ghee, so that they wont stick together.
• Heat 1 tbsp of oil in a shallow pan and add seasonings
• When the nuts are brown add chopped onion and green chillies
• Fry till the onions are golden brown, add turmeric, salt, chilli powder and fry for a minute
• Mix the grated carrots and sprinkle with little water, keep on low flame to cook
• Mix the rice and above masala
• Add lime juice if needed, garnish with finely cut coriander leaves

HARA BHARA RICE
INGREDIENTS :
Rice – 3 cups, Coriander – a bunch, garam masala - 1½ tspn, curry leaves – a few, garlic – 2 pods, ginger – 2 pieces, onions – 2, green chillies – 6 to 8,chilli powder – 1 tbsp, salt – to taste
PROCEDURE :
• Cook rice separately and spread them on a plate with little ghee, so that they wont stick together.
• Make a paste of coriander, curry leaves, chillies, ginger, garlic and ½ onion.
• Pour some oil and chopped onions
• Add the paste, chilli powder and garam masala powder according to taste
• Add salt and mix rice nicely and garnish with coriander.
THAI FRIED RICE
INGREDIENTS :
Rice – 2 cups, vegetables – 2 cup (carrot, cabbage, cauliflower), onion – 1 medium, sugar – 1 tspn, tomato – 1 medium, garlic – 7 to 8, oil -2 tbsp, soya sauce – 1 tspn, Vinegar – 2 tspn, cucumber – small, red chilli powder – 1 tspn, lemon – ½, salt – as needed.
PROCEDURE:
• Cook rice separately and spread tham on a plate with little ghee, so that they wont stick together.
• Place a kadai with oil on a high flame, add finely chopped garlic and stir fry
• Add onions fry for a minute and add tomato, mixed vegetable and salt.
• Keep on stirring till the vegetables are done
• Add the above to the rice along with soya sauce, vinegar and chilli powder.
• If needed sugar also can be added


BENGALI PULAO
INGREDIENTS:
Rice – 500 gm, bay leaf – 2, ghee – 200 gms, sugar – ½ tspn, cloves – 6, raisin – 30 gm, cinnamon – 1, cashew – 12, ginger paste – 1 tspn, cardamom – 6, milk – 1 tbsp, onion -1, saffron – few, salt – to taste
PROCEDURE:
• Heat ghee and add bay leaf and onion slices to it
• Add the cloves, cinnamon, cardamom, cashew and ginger paste, fry till it is light brown
• Add rice, sugar and salt
• Add raisin, saffron and milk mixture and mix well.
• Add 4 cups of water and cook it in low flame

CORN MASALA RICE
INGREDIENTS :
Rice – 1 cup, corn kernels – 1 cup, green peas – 1 cup, cashews – 12, chilli powder – 1 tspn, sugar – 1 tspn, sambar masala – 1 tspn, turmeric – ¼ tspn, garam masala – ½ tspn, lemon – 1 (juice), ghee – 2 tbsp, cumin – ½ tspn and mustard for seasoning
PROCEDURE:
• Cook rice separately and keep it aside
• Heat the ghee in sauce pan, add cashews and sauté
• Add mustard, cumin seed, corn, peas, dry masala.
• Add the rice to it and 5 cups of water to it
• Add lemon juice, sugar, coriander and cashews
• Serve hot

BISI BELA BATH
INGREDIENTS :
Rice – 1 cup, red gram dhal – 1 cup, carrot – 50gm, beans – 50 gm, peas – 25 gmdry chillies – 8, coriander – 6 tbsp, black gram dhal – 1 tbsp, fenugreek – ¼ tspn, cinnamon – a piece, clove – 5, coconut – ½ cup, cardamom – 1, curry leaves – a piece, tamarind – lemon size, jaggery – a bit, khus khus – 3 tspn, salt – to taste.
PROCEDURE:
• Fry cinnamon, cloves, khus khus, cardamom, fenugreek without oil.
• Fry dry chillies, coriander, black gram dhal, curry leaves with oil and coconut also
• Grind altogether into a coarse paste
• Boil red gram dhal (6 cup of water)
• After 30 mts when the dhal is half done add rice and vegetables
• When it is cooked add turmeric powder, salt, jaggery and tamarind water
• When it boils add the ground masala and cook in low flame
• Fry cashews in ghee and garnish it.

CURRY LEAVES RICE
INGREDIENTS:
Curry leaves – 2 cups, Bengal dhal – 1 tbsp, mustard – 1 tspn, coriander powder – 1 tbsp, red chilly (dried) – 10, asafetida – a bit
PROCEDURE:
• Cook rice separately and spread them on a plate with little ghee, so that they wont stick together.
• Fry the mustard, dhals and chillies separately
• Fry the curry leaves without oil until it becomes crispy
• Mix all the ingredients and grind it to fine powder
• Add salt and ghee to the rice and mix the powder in it.

FENUGREEK LEAVES RICE
INGREDIENTS :
Fenugreek leaves – 2 cup, tomato – 2 cup, onion – 1 cup, GG paste – 1 tbsp, aniseed – 1 tspn, oil – 1 tspn, chilli powder – 2 tbsp, turmeric powder – 2 tspn, coriander leaves – 1 cup, cardamom, cloves and salt – to taste
PROCEDURE :
• Wash the rice and soak it in water for ½ an hour
• Cardamom, cloves and aniseed should be fried in oil or ghee add rice also and fry
• Add oil, aniseed, chopped onion, GG paste, tomato, chilli powder, turmeric powder and garam masala powder in a pan.
• Add fenu greek leaves, rice and all the ingredients allow the rice to cook with water
• Garnish with coriander leaves and serve hot.

BEET ROOT RICE
INGREDIENTS :
Rice – 2 cup, beet root (grated) – 2 cup, green chillies – as needed, coriander powder – 1 tbsp, cumin seed – 1 tbsp, coriander leaves – 1 bunch, salt – to taste
PROCEDURE :
• Cook rice separately and spread tham on a plate with little ghee, so that they wont stick together.
• Add oil and fry cumin seeds, green chillies, coriander leaves and beet root and salt.
• Add the mixture to the rice and serve hot.

GROUND NUT RICE
Rice – 2 cup, roasted ground nut – 1¼ cup, gingelly seeds – 1 tspn, dry chilly – 8, matured coconut grating – ¼ cup, turmeric powder – ½ tspn, salt – to taste, for seasoning – oil, cumin, Bengal gram dhal, red gram dhal, curry leaves.
PROCEDURE :
• Cook rice separately and spread them on a plate with little ghee, so that they wont stick together.
• Coarsely ground the ground nut
• Add oil and fry chillies and coconut
• Fry gingelly seeds without oil
• Mix all the ingredients with rice and garnish it with coriander leaves


DISCO RICE
GREEN RICE
INGREDIENTS :
Ginger – 1, garlic- 6 pods, green chillies – 6(paste), onion – ½ cup, green peas – ½ cup, beans – ½ cup (boiled), oil – ¼ cup, mango powder – 1 tspn, , cumin seeds – 1 tspn,
• Cook rice separately and spread them on a plate with little ghee, so that they wont stick together.
• Add oil and fry cumin seeds and onion
• Add the green chilly paste and fry it till it is cooked
• Add the mango powder, peas and beans and fry.
• Allow it for few minutes
• Add the prepared rice in the mixture and add the salt to it
SocialTwist Tell-a-Friend

Wednesday, December 12, 2007

Recipes


SUMMER COOLERS
CHIKKOO PAYASAM
INGREDIENTS
Chikkoo (scooped)- 1 cup, coconut milk- 1 cup, condensed milk- ½ cup, jaggery- ½ cup, cardamom powder, raisins and cashews- as needed
PROCEDURE
• Add coconut milk condensed milk, jaggery and cardamom powder
• Mix the ingredients together and strain it
• Add the scooped chikkoo and garnish it with raisins and cashew
• Serve chilled


PINEAPPLE MILKSHAKE
INGREDIENTS
Pine apple- 1, milk- 1 lt, sugar- ½ cup, colourant (yellow)- ½ tspn, ice cube- 1 cup, pineapple essence- in drops
PROCEDURE
• Extract the pulp and juice is not needed
• Add the sugar, milk, colourant, essence and ice cubes
• Blend it in the mixie and serve

MELAN SHERBETH
INGREDIENTS
Melon- 2 cups, pepper powder- ½ tspn, lemon juice- 1 tspn, salt – a pinch
PROCEDURE
• Extract the juice and add the other ingredients

APPLE CELERY PUNCH
INGREDIENTS
Apple – 1, celery grated- 2 tspn, sugar- 2 tspn
PROCEDURE
• Extract the juice and add the other ingredients

MUSKMELON ORANGE BLISS
INGREDIENTS
Musk melon- ½ cup, orange juice- 1 cup, mint leaves- 4, honey 2 tspn
PROCEDURE
• Extract the juice and add the other ingredients

MANGO YOGHURT CHILLER
INGREDIENTS
Mango slice- 2, yoghurt- 2 cup, cardamom and cinnamon powder- a pinch, honey- 2 tspn
PROCEDURE
• Extract the juice and add the other ingredients

MELON GRAPE GRANITA
INGREDIENTS
Melon- 2 cup, black seedless grapes- 1 cup, sugar- 2 tspn, chukku podi- ¼ tspn
PROCEDURE
• Blend all the ingredients in mixie and strain. Allow to freeze and then blend again. Serve chilled

HURRICANE
INGREDIENTS
Pineapple juice- 150 ml, raw mango juice- 100 ml, cumin powder- a pinch, chat masala- a pinch, tender coconut water- 50 ml or sugar syrup, coconut milk- few drops
PROCEDURE
• Take pineapple juice, cumin powder, chat masala tender coconut water and few drops of sugar syrup.
• Shake it well and pour the mixture in a glass tumbler.
• Add the mango juice and garnish with coconut milk. Serve chilled

COOL CLASSIC
INGREDIENTS
Vanilla icecream- 1 cup, mint leaves- 1 or 2, milk- 1 cup, banana-1, honey-2 tspn, strawberry syrup-2 tbsp,
PROCEDURE
• Cut the half banana into slices
• Add vanilla ice cream, milk, honey and 2 mint leaves
• Blend all the ingredients in mixie and serve cool

KATHRINA FRAPPE
INGREDIENTS
Kamala orange juice- 150 ml, honey- 2 tspn, sugar syrup- 2 tbsp, banan-1, strawberry syrup- 2 tbsp
PROCEDURE
• Cut the banana into slices, add ice cubes, orange juice, honey and blend it in a mixie
• Pour the strawberry syrup in a glass tumbler and pour the prepared mocktail and serve chill

APPLE CRANBERRY JUICE
INGREDIENTS
Apple juice- 1 cup, lime juice- 1 cup, cranberry juice- 1 cup
PROCEDURE
• Mix all the juice and serve

FRUIT FUSION
INGREDIENTS
Diced papaya- ½ cup, Mango juice (ripe) – 150 ml, strawberry syrup- 2 tspn, sugar syrup+lime- 2 tbsp
PROCEDURE
• Blend all the ingredients in mixie and serve chilled

AVAL KESARI
INGREDIENTS
Aval-200 g, ghee-100 g, cashews-10, sugar- 100 g, cardamom powder-1 tspn, kesari powder- as needed
PROCEDURE
• Grind aval to a coarse paste and soak it in water. Knead it
• Boil ¼ cup of water and add kesari powder and aval
• When aval is cooked, add sugar
• Add ghee to avoid kesari sticking to the sides
• Garnish with cashews
Aval or Puffed rice is a good source of iron and calcium...Recipes are easy to cook and easily digestible.Consuming it along with lime juice or orange juice ibcrease the absorption of iron.

AVAL ROAST
INGREDIENTS
Aval- ¼ kg, Parboiled rice- ¼ kg, raw rice- ¼ kg, curd-1 cup, mustard, black gram dhal-1 tspn, salt-to taste, curry leaves-to garnish
PROCEDURE
• Mix both rice and soak it in water.
• Soak aval separately
• Grind together and add salt to taste.After about 4 hours add curd
• Add mustard, black gram dhal and curry leaves after frying them in little amount of oil
• Add water and make it into a batter to prepare dosas.

AVAL VADAI
INGREDIENTS
Rice flakes-100 gm, onions (chopped)-25 gms, green chilly(chopped(-10 gm, ginger(chopped)-10 gm, coriander(chopped)-15 gm, curry leaves-5 gm,cumin-5 gm, garam masala powder- a pinch, besan flour-50 gm, oil- for frying, salt-to taste
PROCEDURE
• Soak rice flakes till soft
• Mix all the ingredients to a thick consistency
• Shape into equal-sized balls and flatten
• Deep fry till crisp
• Serve with coconut chutney or tomato ketchu


AVAL PUTTU
INGREDIENTS
Aval- ¼ kg, coconut grated- 1 cup, sugar- 100 g, ghee, cashew, cardamom- as needed
PROCEDURE
• Add ghee and fry aval in it
• Grind it to a powder
• Sprinkle boiling water to aval, add salt and allow it to cook in steam.Mix coconut, ghee and sugar to it
• Garnish with cashew.

VEGETABLE AVAL
INGREDIENTS
Aval-1 cup, peas, carrot, beans-1 cup, tomato-1, ginger garlic paste- 1 tspn, coriander-to garnish, grated coconut-1 cup, green chillies-3, cinnamon, clove-1, oil/ghee-1 tbsp
PROCEDURE
• Add ghee/oil and fry all the ingredients except aval.
• Clean and soak aval. Drain excess water
• Mix everything and allow to cook. Serve hot with dates chutney

FRUIT AVAL
INGREDIENTS
Aval- 1 cup, diced fruits- 1 cup, milk-1 cup, Sugar- ¼ cup
PROCEDURE
• Soak aval in milk
• Add the fruits and sugar
SocialTwist Tell-a-Friend

Monday, December 10, 2007

Bubble Painting


Materials Required: Washing powder, Tray, Ink or food colourant, A4 sheet, Black poster colour
Find a washing up bowl and squeeze a generous amount of washing up liquid into it.
Add in some cold water, roll up your sleeve and swish the water around to create plenty of bubbles.
Now you'll need some different coloured inks - or food colouring.
Dribble a few different colours onto the surface of the bubbles. Place the A4 sheet above thw bubbles don’t oush too hard
You need to work quite quickly so that the bubbles don't disappear!
Remove the paper after a few seconds.You'll be left with a beautiful pattern You could use them as picture backgrounds for silhouettes ..or even for greeting cards, picture frames, and wrapping paper.
SocialTwist Tell-a-Friend

Paper Weaving Technique


Materials Required: A4 sheet, colour paper, knife or blade, pencil and acrylic colours or water colours
Procedure
Draw the outline picture of a bird or animal tat u want to create with this technique on the A4 sheet
Have a reference picture and select colours accordingly
Use blade to make slits. Insert the colour strips one by one…
Make sure tat the colour paper and white(A4 sheet) comes alternatively
SocialTwist Tell-a-Friend

Thursday, December 6, 2007

Paper Art


Paper art is a simple craft technique made with simple foldings unless like origami it not only involves folding but also cutting and pasting too...
SocialTwist Tell-a-Friend

Saturday, December 1, 2007

LOVE

He came. He saw. I conquered
That was our first meeting.
I was too shy to meet his eyes, but I knew everytime they were on me.
And when at last I looked at him…
l knew he was offering his heart to me…


Once in a lifetime, to a lucky
Few, a Miracle
happens and dreams get realised….
I know it happens,
because it happened to me As I
found my sincere and true ‘once in a lifetime’ love
in U

I'm sleepless at night

As well as restless during day
Just whenever you're out of sight
I have this feeling everyday
Its true that we don’t know wat we hav got until v lose it,
its also true that we don’t know wat we have been missing until it arrives….

The joy for my life time is in your simple smile…Keep smiling
SocialTwist Tell-a-Friend

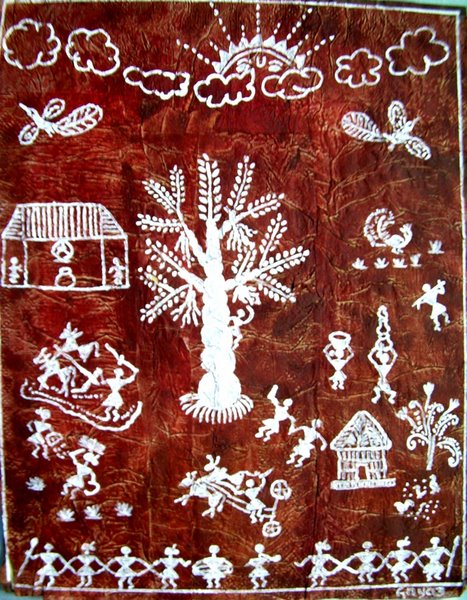
Warli painting


A simple way to do warli painting...
Materials needed
Newspaper, tissue paper, glue & water- 1:3 ratio, correction pen, brush, brown oil paint , sponge
Procedure
Cut the piece of newspaper to A4 size
Now place the tissue paper over it and cover thw newspaper
Apply the glue with the help of the brush on the tissue paper…This way cover the newspaper with tissue paper
Allow it to dry for a day ( Now we get the desired texture- a tree bark)With the help of sponge paint the tissue paper and let it dry overnightNow use the correction pen and paint…
Paint should be in white colour…In traditional paintings they use rice flour….
SocialTwist Tell-a-Friend

Sand Painting


Materials required
Sand, colour powders, glue mixed in water ratio-1:2, A4 sheet, cloth or card board,pencil and eraser, rangoli powders tat are readily available can also be used in place of sand and colour powder.
Procedure
Draw the outline of the picture tat you want to make it a sand painting
Sieve the sand so tat it doesn’t have any gravels
Mix the colour powder with sand and keep the colours ready
Now apply glue and then fill the part with the colour tat is desired
Outline of the painting can be given with oil paint or marker pens
Allow it 2 dry for an hour and brush off the extra sand from the painting and then frame.
SocialTwist Tell-a-Friend

Paper Quilling


Quilling or paper filigree is the art of rolling thin strips of paper into different shapes and using the shapes to form designs. Quilling has been around since the Renaissance age, but I was only recently introduced to it. It is fun and easy and I find it to be pretty relaxing.
SocialTwist Tell-a-Friend