Sunday, August 30, 2009

NECKLACE


PROCEDURE
The necklace is made of straw n wooden beads...bright coloured straws will look attractive
SocialTwist Tell-a-Friend

Thursday, August 20, 2009

ORIGAMI-DINOSAUR

SocialTwist Tell-a-Friend

Saturday, August 15, 2009

Sunday, August 2, 2009

COMPLEMENTARY COVER


COMPLEMENTARY COVER
Dont throw away the wedding invitations, juz reuse them as complementary covers....
SocialTwist Tell-a-Friend

Saturday, August 1, 2009

GREETING CARD


Just used safety pins n colour threads to make this card...Beads add colour n looks nice with the pins...
SocialTwist Tell-a-Friend

Saturday, July 11, 2009

GIFT BOX

SocialTwist Tell-a-Friend

Wednesday, July 8, 2009

PINWHEEL


MATERIALS REQUIRED
Construction paper, wire, bead or rubber that can be used as a stopper, pencil or wooden stick
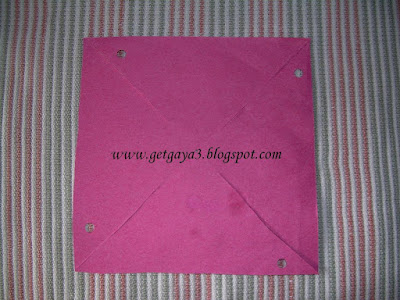
PROCEDURE•Take your square construction paper and draw a diagonal from the top left corner to the bottom right corner and from the top right corner to the bottom left corner.
•Make a hole in the center. Use a compass and draw a circle around the center point that measures about 3 cm. Cut each of the lines from the corner to the circle.
•Punch a small hole on the side of each corner as shown in the picture.
•Coil your wire around the wooden stick. Attach a wooden ball to the wire and then insert the wire through small hole in the center of your paper
•Start with one corner and bend the paper over so that the wire can be inserted into the punched hole. Continue this with each of the 3 other corners.
•This is how the pinwheel looks once all of the ends are attatched to the center. Use your hand to hold it together until the next step is completed.
•Add a punched out motif to the center if desired and then another wooden ball or bead or rubber. Use the pliers to bend the remaining wire over into a loop so that the wire is secure. If done correctly the pinwheel can now spin in a breeze. If it gets caught on the stick, you may need to bend the wire some until it is sitting correct and can turn freely.
SocialTwist Tell-a-Friend

Sunday, June 28, 2009

NECKLACE WITH SEEDS


MATERIALS REQUIRED
Seeds, needle, thread, beads, varnish
PROCEDURE
•Soak the seeds in water for 24 hours. After that they may germinate.
•Soaking makes the dried seeds soft and its easy to pierce the needle through them.
•Plan the design that you are going to make and then start adding the seeds and beads inbetween.
Do the circular parts n pendant separately and attach it to the chain later. Once finished allow it to dry and apply a layer of varnish.
SocialTwist Tell-a-Friend

PAPER PEACOCK


INSTRUCTIONS
SocialTwist Tell-a-Friend

Sunday, June 14, 2009

FLOWERS

MATERIALS REQUIRED
A colourful carrier bag, Scissors ,Tape
PROCEDURE
•Take a carrier bag that's a bright colour
•The idea is to draw six or seven petal shapes - pointy ovals - onto the carrier bag.
•Cut them out carefully
•For the centre of the flower, cut out a circle from a different coloured bag. Pinch it in the middle, bunching the circle up.
•Hold it in place with some tape.This can be a bit fiddly!]
•Then, add on the petals.Put them around the edges.
•Hold two or three in position, and add on some tape.
•Keep adding petals in the same way, going around the centre, until you've created a whole flower.
•You could even twist a green bag into a long stalk, holding it in place with lots of tape.Stick the flower onto the other end!
•You can experiment with different coloured bags. and different petal shapes.
SocialTwist Tell-a-Friend

Sunday, June 7, 2009

Sunday, May 31, 2009

Sunday, May 24, 2009

Friday, May 15, 2009

ROCKING DUCK


MATERIALS REQUIRED
Scissors, Paper plates, Glue, Crayons or poster colours
PROCEDURE•For the body, cut out a circle from the edge of a paper plate
•Cut out a head from the left over circle. Glue it on the body
•Fold another paper plate in half. Glue the duck onto the folded edge
•Colour the duck, Colour the folded paper palte in blue colour so that it looks like water. Now push the duck so that it rocks.
SocialTwist Tell-a-Friend

Sunday, May 10, 2009

Saturday, May 2, 2009

PAPER CUP ART

Use paper cup to make hut, castle, a clown, Christmas tree
SocialTwist Tell-a-Friend

Sunday, April 26, 2009

NECKLACE


MATERIALS REQUIRED
Shoe sole, beads, glue, scissors, paddy or any other cereal or pulse of your choice and thick black or any coloured thread, varnish
PROCEDURE
•Cut the shoe sole into any shape and this makes the pendant of your necklace.
•Now stick paddy and beads to decorate it.
•Cut the black thread to the length you want and then stick it to the backside of the pendant
•Allow it to dry and apply a thin coat of varnish on paddy so that it doesn’t deteriorate.
SocialTwist Tell-a-Friend

Sunday, April 19, 2009

LIGHT BULB RAT


MATERIALS REQUIRED
Light bulb, newspaper, glue, tissue paper, chart, poster colour, scissor,
PROCEDURE
•Cut newspaper into pieces
•Mix glue and water in the ratio 1:3
•Apply the glue mixture on the bulb and stick the newspaper all over the bulb.
•Once it dried stick white colour tissue paper all over the bulb.
•Now colour the bulb in black.
•Cut the shape of ears nose n mouth for the rat.
SocialTwist Tell-a-Friend

Sunday, April 5, 2009

PHOTOFRAME

SocialTwist Tell-a-Friend

Wednesday, April 1, 2009

CLOTH EMBOSSING

SocialTwist Tell-a-Friend

Sunday, March 29, 2009

LIGHT BULB PENGUIN


MATERIALS REQUIRED
Light bulb, newspaper, glue, tissue paper, chart, poster colour, scissor,
PROCEDURE• Cut newspaper into pieces
•Mix glue and water in the ratio 1:3
•Apply the glue mixture on the bulb and stick the newspaper all over the bulb.
•Once it dried stick white colour tissue paper all over the bulb.
•Now colour the bulb in black.
•Cut chart in the shapes of eyes, beak, wings, legs and to add glamour make a hat for the penguin.
SocialTwist Tell-a-Friend

Sunday, March 22, 2009

MATCH STICK ART

SocialTwist Tell-a-Friend

Sunday, March 8, 2009

Monday, March 2, 2009

Sunday, February 22, 2009

CALENDAR HUT


MATERIALS REQUIRED
Full sheet of a daily calendar

PROCEDURE
•It’s an origami technique.
•Do alternate triangular folds and flat folds. Follow the instructions in the figure.
Fold along the dotted lines.From 1st jan sheet to 31st dec sheet.
•Once finished you will automatically get the shape of the hut.
•If u want colour it and decorate it with beads.
SocialTwist Tell-a-Friend

Sunday, February 15, 2009

PAPER DECORATION


Pleated paper Decorations
MATERIALS REQUIRED
Decorative Paper, Graph Paper,Glue
Pleated paper can be adapted to produce a wide variety of designs. It can be shaped into a chain, opened into a star or cut into a dainty snowflake.First pleat the graph paper in the desired intervals, then flatten it out and lay on it decorative paper to be folded. Starting at one end, refold the graph and decorative paper together to reproduce accordion pleats of uniform size.

FAN SHAPED DECORATION
MATERIALS REQUIRED
Colour papers- any 3 colour, scissors, compass- to draw circle, glue, stapler and thread
PROCEDURE
•Any three colours can be used to make this beautiful decorative chain. The number of pieces depends on how long a chain you want to make.
•Take three different shades of decorative paper of slightly different sizes. Here I have taken orange, green and pink
•To make one fan shaped piece, stack three pieces of the different shades of paper one above the other.
•The smaller size of paper should be on top. Make accordion pleats i.e small pleats of equal width at equal distance.
•Hold the pleated papers together and staple in the center. Make a number of fan shaped pieces in the same manner and keep aside two of them.
•Join the remaining pieces together with glue to form a chain.
•The two pieces kept aside can be used as the end pieces
•The same chain can be pulled into a circle to form a decorative star design. The ends of the fan shaped pieces which forms the inner layer of the circle can be glued together to form the design as shown in figure. Five fan shaped pieces are needed to form a small star shaped design.
SocialTwist Tell-a-Friend

Sunday, February 8, 2009

GARLAND


MATERIALS REQUIRED
Polyester cloth- Cream and red colour, thread, needle, scissors
PROCEDURE
•Draw circle of about 4cm radius on the cloth. Draw as many circle as possible. Around 200 pieces are needed to make a small garland.
•Cut out each piece. For variations different colour cloth can be used.
•Make the needle and thread ready and roll the circle to get a thin strip and pierce them t the center and start doing this with all the circles.
•Use other colour cloth also to create a varied effect. When you are happy with the length of the garland tie a thick thread at both ends.
•Now the garland is ready to use.
SocialTwist Tell-a-Friend

Sunday, February 1, 2009

PAPER BUTTERFLY


INSTRUCTIONS
SocialTwist Tell-a-Friend

Sunday, January 25, 2009

TEXTURED DRAWING


MATERIALS REQUIRED
Crayons or pencil. Coins, leaves or comb that are flat but have texture
PROCEDURE
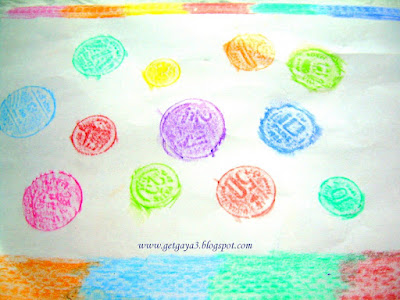
Lay these particular things under a sheet of paper
Take either crayons or pencils and rub these over the paper where the article is laying underneath.
You will see the texture of the item now on the paper.
SocialTwist Tell-a-Friend

Sunday, January 11, 2009

SOLA WOOD ART


MATERIALS REQUIRED
Sola wood (wood from tapioca), Scissors, glue, pencil, chart paper
PROCEDURE
•Draw the outline of the figure on to the chart.
•To make a lotus, I have cut out the parts of the flower from the sola wood and stuck it one above the other to create an embossed effect
•To make a peacock, I have used different shapes, for the body round shapes which u can get by punching holes on the sola wood with punching machine.
•For the wings just a simple leaf shape and for the feathers, leaves with grooves. Stick them closely together, one below the other to get the desired effect,
•For the coconut tree, Cut leaves with grooves and make the sola wood into a round ball for the coconuts. Sola wood is easy to mend and easily withers. So handle it carefully.
SocialTwist Tell-a-Friend

Wednesday, January 7, 2009

PAPER PLATE ANGEL


MATERIALS REQUIRED
Paper plate, pink and black colour chart paper
PROCEDURE
Cut the paper plate into half
Make a cone with one piece and this forms the body of the angel
Cut two wing shapes on the other half, can cut Hands too
Pink colour chart can be used for face and hand
Black can be used for head and hair
If u wanna hang the angel, take a thread and attach it to the back of the head or use aluminium foil paper.
SocialTwist Tell-a-Friend

Thursday, January 1, 2009

Hovering Card

SocialTwist Tell-a-Friend